Sunday, March 20, 2011

Playful Prawn Pelvises

Well I feel a little better now - I'm only a couple days off with this post, rather than a full week.

So based on the overlapped outlines from the last post...


... I definitely had to add some more bulk to CJ's chest.


And adjusting the back.... (does that make me a Space Cricket Chiropractor?)


Now based on the side view, the hips didn't need to be adjusted that much, but based on the front view...


... CJ's hips were looking a little on the skinny side. They needed some rounding and bulking out.


I think next time I'm going to try and match up the angles between the sculpt and the reference photo for the front view so I can compare them as I've been comparing the sculpt to the side view.


Sadly that won't be for a few days though. As badly as I want to play with CJ I have a week to finish my sister's wedding dress AND prep the make-up for an independent film I'm helping with.

Important projects to be sure - but I do so miss CJ when I can't work on him ;)

Saturday, March 19, 2011

First A Dinosaur And Now - Professor X?!?

Yikes - well these pics are at least a week old (if not, perhaps, a little... more) but that's actually because I've been too busy sculpting to post :) (although not all of that sculpting was on CJ....)

So when we last left our intrepid Prawnling I'd roughed in the basic sculpt and it was onto the fun of refining things! :)

For which I decided the best place to start was at the top!

Sadly this meant popping off those cute temporary skewer stick antennae and undoing a lot of the nice details I was happy with when I first sculpted CJ's head before Christmas....

Rake - smooth, rake - smooth and thus...


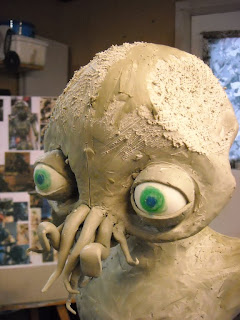
Is it just me, or is CJ starting to look a little like Professor Xavier?


Kojak?

Egghead?


His profile was looking pretty good so I decided to compare it to my reference pic again in Photoshop. But in playing with the opacity filters over the two pictures I realized that it was sometimes hard to tell what was the edge of the reference photo and what was the edge of the sculpt.

So I took a fresh layer, lowered the opacity, and traced over the reference photo with a nice, bright colour like so. Then I repeated the process with my latest photo of the sculpt.


Then I set the opacity on both to 50% and overlapped them
(I had to change the green to blue because otherwise the red and green cancelled each other out where they overlapped. This is me failing Colour Theory 101)


So now the trick is to adjust the sculpt till the red lines match up with the blue ones (at least the head and torso lines - the "scaffolding" that's holding CJ up actually prevents me from sliding the legs into the exact same position as the ref pic).

I have had a few second thoughts about using this Photoshop overlay method quite so much. On the one hand it's quite helpful in showing me errors. On the other hand I wonder if it's really helping train my eye to analyze the shapes and forms correctly or am I just using it as a crutch?

Yet it's a common sculpting trick to hold a mirror up to your work in order to recognize irregularities in the sculpture that your mind has otherwise become desensitized to. Is this not just a high-tech mirror? I wonder...

Friday, March 4, 2011

... CJ gets a face lift

... and with the completion of CJ's right arm (or at least the rough version) we have a basic Prawnling! :D

And to celebrate (at least while I waited for a couple slabs of clay to warm up) I decided CJ needed a slight facelift.

I quickly adjusted his eyes so that they face forward again (since fixing the position of the head a few posts back they've been aimed at the floor) and I grabbed a couple skewers to stand in as temporary antennae.


So we get our first good hint of what the finished CJ puppet is going to look like :D


I know this is just the rough sculpt (still in the very beginning stages really) but I'm really quite pleased so far. And excited.

Onwards and upwards! :D

Wednesday, March 2, 2011

My sculpting gets a shot in the arm ...

A big double post today to encapsulate the last 3 sessions. Sadly I'm only getting an hour's sculpting time with CJ every second day or so - haven't quite figured out how to juggle making my sister's wedding dress, working on CJ, preparing for an independent film shoot I'm working on in April, and juggling a regular day job (amongst other things). I'm improving - but again in tiny intervals :P

Very close to having the first pass at the sculpt done though. CJ's definitely looking like a Prawnling now! :)

Here I'm just bulking out the armpit areas to match the reference material more closely...


I squeezed in a mini 20 minute session earlier in the week. However when I got back in the workshop for the next session I wasn't happy with how bulky I'd made CJ's forearm (not to be confused with his 4th arm, which hasn't been added yet ;) )
So I took a wire rake tool and scraped back some of the excess clay (1st pic) before smoothing and further reducing the surface with a loop tool (2nd and 3rd pics). The rake tool helps reduce larger bumps and unevenness in the surface whereas a light, even application of the loop tool helps smooth things out.


Building up the forms in CJ's shoulder and bicep. You can see in the left-most pic where I used the loop tool to help narrow the shape of the arm near the elbow, and then later (the last pic) where I used the loop to help make the size transition more smooth and even.


Building up the distinctive spikes at the tips of CJ's shoulder exoskeleton.


And CJ with his newly roughed in left arm...


And blocking in the right arm, using pretty much the exact same process...


And that means...